New code here v2.4
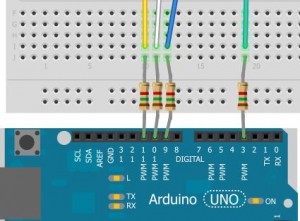
On v2, I didn’t assign all the directional wires PWM pins, and it caused me to use the purple wire as speed which was unnecessary. In v2.1 the speed and direction come from the direction wires. Also, I learned from this link the Bescor goes to ground at limit which means it will stop moving overtime when it goes in two directions. By using 1.5k resistors on each end of the four wires, the Bescor doesn’t reach the ground limit.
White = up
Blue = down
Yellow = left
Green = right
White = pin 10
Blue = pin 9
Yellow = pin 11
Green = pin 3
The Bescor had a lot of electrical noise, so I changed the PWM frequency using this code.
/*
*
* This program controls the Bescor MP-101 Pan/Tilt system using the Wii Nunchuck
*
* Copyright (c) 2012 Matt Alford, http://www.protechy.com
* Date: June 23, 2012
*
* Nunchuck Library created by Gabriel Bianconi, http://www.gabrielbianconi.com/
*
*/

#include "Wire.h"
#include "ArduinoNunchuk.h" // The library used by the Nunchuck

#define left 11 //Pin 12 controls left pan
#define right 3 //Pin 10 controls right pan
#define up 10 //Pin 9 controls up tilt
#define down 9 //Pin 8 controls down tilt

ArduinoNunchuk nunchuk = ArduinoNunchuk();

int varx = 0; // The x-axis variable to store the value coming from the Nunchuck
int vary = 0; // The y-axis variable to store the value coming from the Nunchuck
int absx = 0; // The x-axis variable used to store the absolute value.
int absy = 0; // The y-axis variable used to store the absolute value.

void setup()
{
Serial.begin(115200); // Opening the serial port

nunchuck_setpowerpins(); // use analog pins 2 & 3 as gnd & pwr

TCCR2B = TCCR2B & 0b11111000 | 0x07; //Adusting PWM frequencies for testing pins 11 and 3
TCCR1B = TCCR1B & 0b11111000 | 0x05; //Pins 9 and 10

nunchuk.init(); //Initialize the Nunchuck code
}

//To power the WiiChuck Adapter
static void nunchuck_setpowerpins()
{

#define pwrpin PORTC3
#define gndpin PORTC2
DDRC |= _BV(pwrpin) | _BV(gndpin);
PORTC &=~ _BV(gndpin);
PORTC |= _BV(pwrpin);
delay(100); // wait for things to stabilize
}

void loop() {
nunchuk.update(); // The Nunchuck values update in the loop

// 130 is the distance from 0 on the joystick
varx = nunchuk.analogX - 130; // nunchuk.analogX is the value of the x-axis
vary = nunchuk.analogY - 130; // nunchuk.analogY is the value of the y-axis

// The values used for speed
absx = varx;
absx = abs(absx); // Convert the x-axis value to an absolute value
absy = vary;
absy = abs(absy);

// Tilt based on the input from the joystick
if (vary > 5)
{

analogWrite(up, absy * 2);
digitalWrite(down, LOW);
}

else if (vary < -5)
{

analogWrite(down, absy * 2);
digitalWrite(up, LOW);
}

// Stop tilt
else
{
analogWrite(up, LOW);
analogWrite(down, LOW);
}

// Pan based on the input from the joystick
if (varx > 5)
{

analogWrite(right, absx * 2);
digitalWrite(left, LOW);

}

else if (varx < -5)
{
analogWrite(left, absx * 2);
digitalWrite(right, LOW);

}

// Stop pan
else
{
analogWrite(right, LOW);
analogWrite(left, LOW);
}
}


Sorry if this is a dumb question as I am new at this type of thing, but do the resistors slow down the motor speed at all? And if so, would a lower resistance still work?
Yes, a resistor can slow down the motor by limiting the amount of current flowing through it, but it also reduces the torque. I don’t know the proper resistance for these motors, but you could try to use a variable resistor which allows you to adjust the current at varying resistances.
Hi Matt,
Why do you use direct power to steer the motors, think when you add transistors over the switching wires you can switch these with pwm so you dont have to send current up to the motors.
I have still check this on the bescor but it worked like this on normal remote controls to make them switch, i use bc 547b with on the base 200k to pwm, collector to ground and switch wire to emitter.
Power on base and the switch goes on.
Greetz Richie
I don’t have a lot of knowledge on remote controllers, but I love to tinker. Working with the Arduino has taught me a lot. The original Bescor controls are setup in an awkward way, and I would like to try anything to improve it. The method I was using probably isn’t the best, but at the time it was one solution.
Hi Matt, no offence iam a thinker and search for solutions like you it was only to give you and others another way to switch without sending power up the machine bit safer maybe 🙂 i readed its switch to ground so thats my thinking adding to your solution. Greetz Richie
Thank you Richie, I want to try using transistors like you suggested. I’ll put in a order this week and see how it goes when the parts come in.
Your welcome, i also build a pan tilt from scratch with at first 2 servos now i have removed the pan servo because the angle was not wide enough 45 degr. i did put in a stepper motor and its goes 330 degr now only need some fine tuning. Only developing costs me a yr so i did buy a bescor so i dont have to make a new one myself.
Try the transistors and i think its precise what you want .
Thanks for your time
GreetZ Richie
Hi Matt,
I did make the switching transistors like mentioned before and it works the only thing whas the wires are strange colored, further i added a 5v lm 7805 to feed my bareduino and i want to make it wirreles 2.4ghz all parts laying around need only time to build it.
Greetz Richie
Hi,
I was wondering which inputs the nunchuck wires go into, when you not using the Ardunion shield, it diagram just seems to show where the midi-cable inputs go?
Thanks
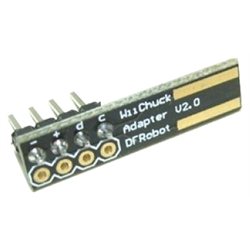
I’m going to make a new tutorial using the Nunchuck. Here’s how it’s connected to the Arduino, but it doesn’t directly connect to the Bescor.
Yellow – A5
Green – A4
White – GND
Red – 3.3v
or you can use an adapter like this one.

Hi Matt,
“In v2.1 the speed and direction come from the direction wires”
What is the freqency of the PWM signal in this version?
This might help. https://playground.arduino.cc/Main/TimerPWMCheatsheet
TCCR2B = TCCR2B & 0b11111000 | 0x07; //Pins 11 and 3 – the frequency is 30.64 Hz
TCCR1B = TCCR1B & 0b11111000 | 0x05; //Pins 9 and 10 – the frequency is 30.64 Hz