In this tutorial, I’ll show you how to connect the Arduino to the Bescor MP-101.
Note: Please check for continuity with a multi-meter. The colors of the wires may be different.
update: 12-26-2013
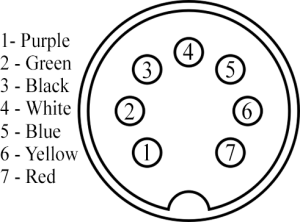
Pinout of the DIN connector.
Pin 1 – Purple
Pin 2 – Green – Right
Pin 3 – Black – Up
Pin 4 – White – Vin
Pin 5 – Blue – Down
Pin 6 – Yellow – Left
Pin 7 – Red – Ground
Step 1: Prepare the Wires
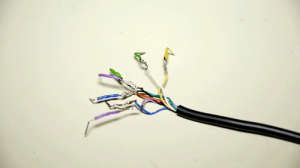
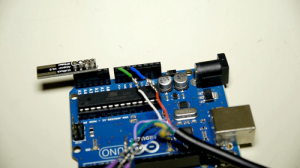
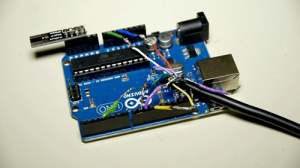
There are several ways to connect the wires to the Arduino. I cut the controller and cut off the ends of the wires and solder jumpers to it. Note: It’s better to cover the exposed soldered connections to prevent the wires from touching.
Step 2: Connect the WiiChuck Adapter, Power and Ground Wires
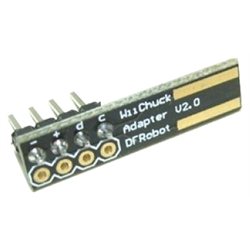
The WiiChuck adapter makes it easy to connect the Nunchuck to the Arduino. Here’s the one I’m using.
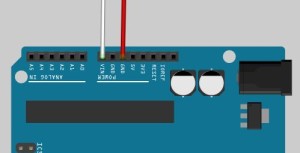
Connect the white wire to vin and red wire to ground.
White – Vin
Red -Ground
Step 3: Connect the Blue, Black, Green, and Yellow Wires
Note: The purple wire is not used.
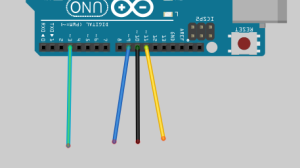
Blue – Pin 9
Black -Pin 10
Green – Pin 3
Yellow – Pin 11

Hi,
If I use a wireless nunchuck instead of a wired one, will it still work?
Thanks
Using a wireless nunchuck is a little tricky. The one I used has poor battery life but worked. Here’s a link Every time I turned on the Arduino with the nunchuck receiver plugged-in, I pushed reset on the Arduino to get the controller working after I got it synced up.
Thanks for this.
I was wondering about the wire you used above. Is it a MIDI cable or is the the Bescor cable?
Wanted to know, so I can follow your instructions as closely as possible, so the color of the wires will match.
Yes, I’m using the Bescor controller cable.
Success!
Although there were a few hiccups along the way. First off, instead of splicing the Bescor remote wire, I used the Bescor extension cable instead. Just so I’ll have a backup remote. As it turns out, the wiring color is different, and there is no purple wire.
Green = vin
Blue = ground
White = left
Black = right
Yellow = down
Red = up
Good afternoon,i followed your istructions very closely but i didn’t cut the controller or the wires.
I took off the GND(red) and the VIN(white) and Arduino in now alimented by an external supply and it doesn’t works.
Then i connected GND and VIN to Arduino and still it doesn’t works.
May i know the plug in model?
I hope to hear from you soon,thank you.
To diagnose the issue, we can plug in the usb cable which should power the Arduino and control the Bescor without using the GND and VIN.
Hello Matt,
I just want to say THANK YOU!!! I followed this new discussion to the tee and it works on the first time. You have made my life easier. THANK YOU THANK YOU THANK YOU.
I just cannot believe the parts that you have changed from last time, but this is really sweet!
Sincerely,
First Time Arduino dude!
jeff
I am using the kyno wireless nunchuck and it is not working. Is it reading something different? Is there a different code I need to be using
The wireless nunchuks are tricky because of the different brands. It’s possible the receiver needs to be on 3v instead of 5v. Also, the receiver has to sync with the nunchuk before the code can read the values properly. You could try this library. http://www.gabrielbianconi.com/arduinonunchuk/
I used this library in the past with this nunchuk
Hi Matt, awesome work!
Is it possible to give a wire color to pin description (looking at the Bescor female connector)?
Thx
Yes, I’ll post the wire color to pin location.
Hi, I just bought a DIN Midi connector and soldered cables to connect it to the arduino without breaking the original remote. Don’t you have a schematic of the wires ?
Like PIN1 = up, PIN2 = Down, etc.. .?
Thanks
Thx Matt, what a nice little project. I had a little grief with the wiring cause I bought my Bescor without a remote. But it’s working. It seems that looking at the back of the Bescor the 5 o’clock pins is the power (Vin), and the 10, 11, 1, 2 o’clock pins are the operators (approximate positions)
Also dummy me didn’t realize right away that I actually had to copy your code from the “Step 2 Upload the Sketch” section in Part 2, into the Arduino software to upload.
Thx again, Garry
Very helpful but I have some fear with the actual voltage that is being supplied through the red and white power lines into the arduino VIN. With 4 AA batteries in the MP-101 I get 6V coming down the power lines. Is that likely to be bad for my arduino (and the wifi shield I have hooked up to it to control the unit by wifi)? I think I might use a voltage regulator to bring it down to 5V, but will there be any issue with doing this and driving the motors?
Using the wifi shield is pretty cool.
You might want to check out the documentation. http://arduino.cc/en/Main/arduinoBoardUno
The Arduino has a voltage regulator with an input voltage limit of 6-20v.
the purple wire seems to be the speed controller. open and it turns full rate. looks like the range is 0-3.3 volts…
Hi Andy,
How did you calculate the 3.3 V range? So how do you know the max voltage isn’t a bit higher?
Hi All,
I used some of the code but replaced the WII controller with a HC-06 BT Bluetooth breakout.
The greatest advantage of the Arduino over the wired remote is that I can make the MP-101 (or MP 360) move very very slowly.
I used this to create some timelapse panning images.
http://youtu.be/AOeFU-xGGv0?list=PL-nSln4P5hQyeor2GckwXlHX7PMiRV5j-
and
http://youtu.be/YUGOF5yG-Hg?list=PL-nSln4P5hQyeor2GckwXlHX7PMiRV5j-
Code?
Hi,
I know it’s an odd question and please forgive my ignorance; is there any way of not using the red or purple connections?
I have acquired one of these MP-101’s, but don’t have a remote control for it.
I have a lot of MIDI (5 pin) cables, so sacrificing one of those to this seems perfectly do-able.
Is there a way to proceed without pins 1 or 7?
Hi,
I am new to this, and please excuse my ignorance.
Is there a work-around that doesn’t use pin 7?
I have acquired a MP-101 without the remote control, and looked to this hack as a solution.
I have many 5 pin MIDI leads that I could use, and this obviously doesn’t have pins 1 and 7.
If pin 7 is being used to power the arduino, could I just power it externally? Its own battery?
Any help would be greatly appreciated, if I have to source 7 pin cables then so be it.
Thanks for your time
James
You can power the Arduino using an power adapter or battery to free up a few spots. http://playground.arduino.cc/Learning/WhatAdapter
Hi Matt,
I saw in your code that you only use an analogWrite value up to 115. The Arduino takes values up to 255. Is there a reason why you don’t apply the full 5V/3.3V to the MP 101? We are using one for our thesis right now and we wanted to know how far we can take it…
115 is in the range for the Nunchuck to work with the Bescor. If we go past this value, the motor speed will stay the same. I’m not sure what you mean by applying 5V/3.3V. On the original controller, the motor speed is controlled by a 22k resistor slider.
Matt,
I built a three camera system without the nunchuck, using an Arduno Mega but the PWM frequency is controlled by different timers,
I saw you adjusted for it here < TCCR2B = TCCR2B & 0b11111000 | 0x07; TCCR1B = TCCR1B & 0b11111000 | 0x05; >
Arduino Mega 2560 timers have no common frequency:
timer 0 (controls pin 13, 4);
timer 1 (controls pin 12, 11);
timer 2 (controls pin 10, 9);
timer 3 (controls pin 5, 3, 2);
timer 4 (controls pin 8, 7, 6);
TCCR0B = TCCR0B & B11111000 | B00000011; <// PWM frequency of 976.56 Hz
TCCR1B = TCCR1B & B11111000 | B00000011; // PWM frequency of 490.20 Hz
TCCR2B = TCCR2B & B11111000 | B00000100; // PWM frequency of 490.20 Hz
TCCR3B = TCCR3B & B11111000 | B00000011; // PWM frequency of 490.20 Hz
TCCR4B = TCCR4B & B11111000 | B00000011; // PWM frequency of 490.20 Hz
Is it possible to divide timer 0(zero) frequency in half to get I close to the other timers? How?
Have you found a frequency where you could get a real slow pan when the camera is fully zoomed in ?
I’m not sure about dividing timer 0, but you could take a look at this library. https://forum.arduino.cc/index.php?topic=117425.0
I haven’t found a good frequency for slow pans without the motors stalling.
I gave up trying to use timer0, instead I opted for timer5 which controls pin 44, 45, 46 at the same frequency of 490.20 Hz like the other four timers 1-4.
I’m glad the Bescor MP-101 motor accepts pwm without the need for a transistor or optocoupler otherwise the Arduino would have been toast. I am driving it at full pwm(255) since I have a 5v Arduimo unit (and no nunchuck) and the Bescor power supply is 6 volts.
Thanks for the post, great information here, an easy build even for three Bescor motors and three LanC interfaces.
Best part is that you don’t destroy the motors and can always go back to the rubber pad controller in an emergency.
Has anyone put a joystick controller on the bescor?